
Night photography settings for the city: trails and lanes
A tram crossing Flinders Street takes about ten seconds to clear the intersection. Leave the shutter open for all of it and the city draws its own picture.
Stand on the corner of Flinders and Swanston streets a little after sunset and watch a tram come through. It crawls. It pauses for pedestrians, sways across the points, throws a blue spark from the overhead wire, and takes the best part of ten seconds to clear the intersection. To the eye, it is a slow green-and-white box. To a camera with its shutter open for fifteen seconds, it is a river of light running past the lit dome of Flinders Street Station.
That is the whole appeal of city night photography. Time becomes part of the picture. The settings that make it work are few and repeatable, and once you have them, every lit street in Melbourne becomes a place to practise.
Night photography settings: the starting point
At night the camera is starved of light, so something has to give. You can open the aperture, raise the ISO or lengthen the shutter. For city scenes on a tripod, the shutter is the one to spend.
- Mode: manual. Night scenes are full of small bright lights and large dark areas, and auto modes swing wildly between frames.
- ISO: 100 or the camera's lowest native setting. The shutter is doing the work, so there is no need to add noise.
- Aperture: f/8 to f/11. Sharp from front to back, and it turns streetlights into small starbursts.
- Shutter speed: 5 to 30 seconds, depending on how bright the scene is and how long you want the trails.
- File format: RAW, so you can fix white balance and recover highlights later.
Put the camera on a tripod and trigger it with the two-second self-timer or a remote release, so your finger on the button does not shake the first moment of the exposure. On many cameras you should switch off image stabilisation when the camera is on a tripod; some systems detect a tripod and handle it automatically, so check the manual for your model.
How to photograph light trails
A light trail is simply a moving light recorded over time. Headlights draw white lines, tail-lights red ones, and a tram draws a broad band of window light with its roof lights tracing a line above.
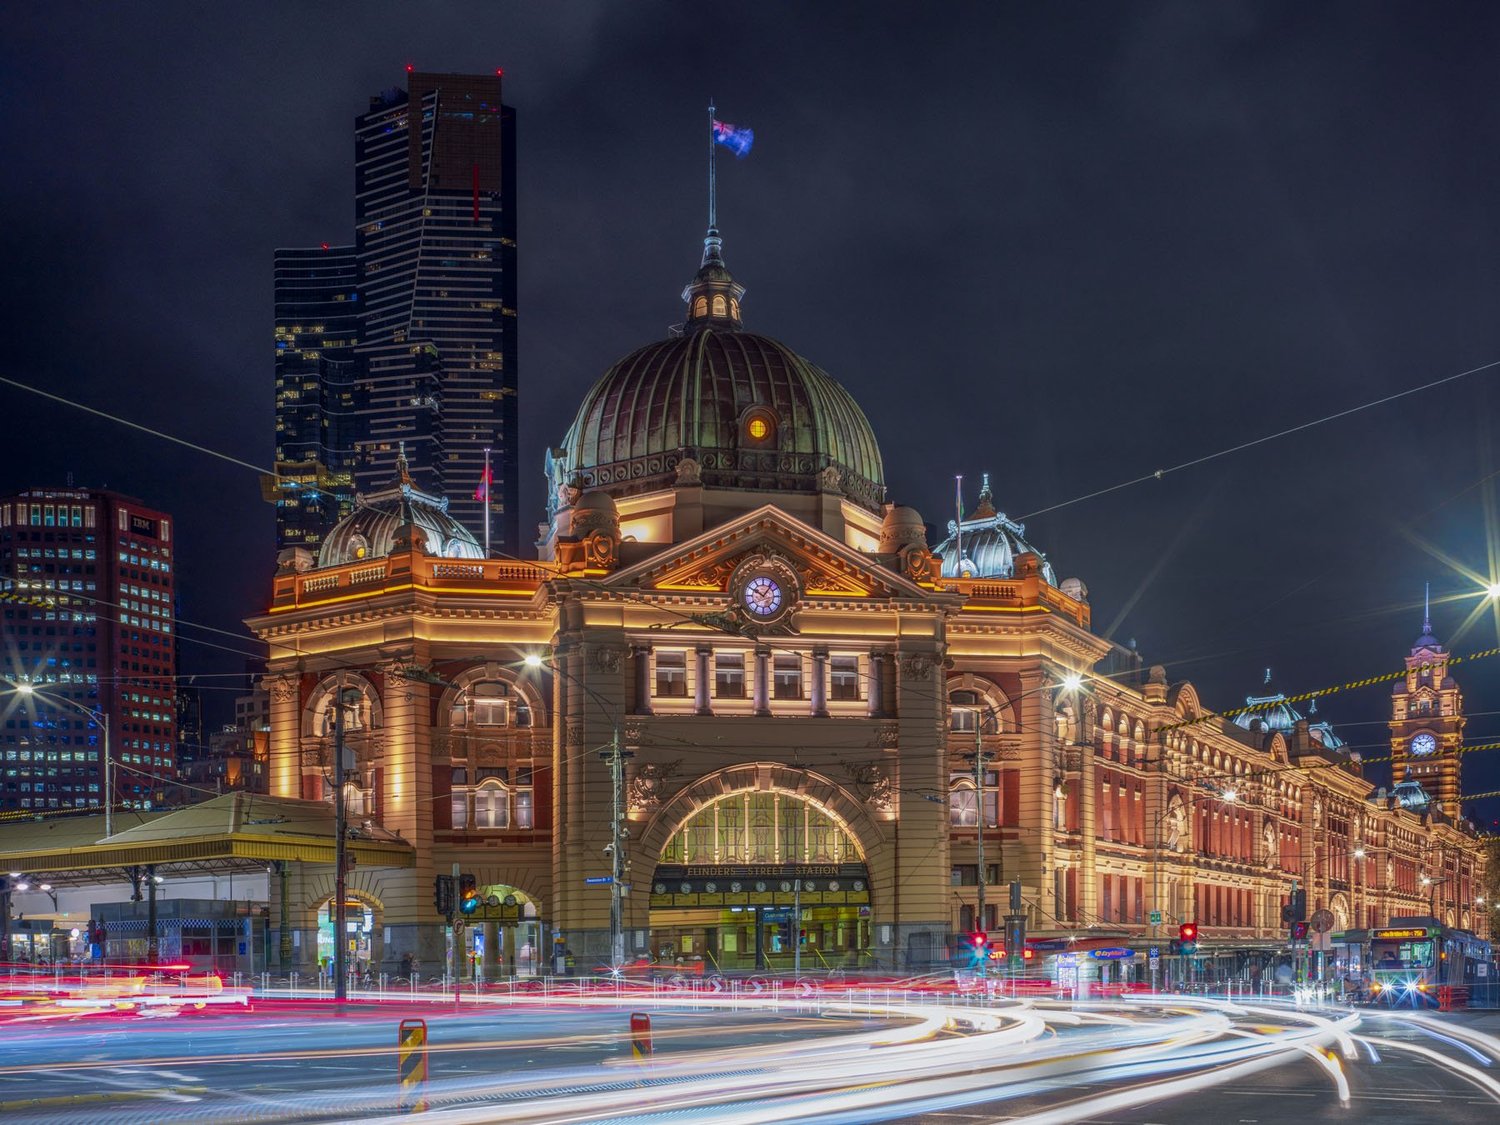
Outside Flinders Street Station you have everything in one place: trams in both directions along Flinders Street and along Swanston Street, cars and buses, and a large, lit historic building to anchor the frame. The Federation Square side of the intersection gives a clean view of the station's facade and clock. Wherever you set up, stay on the footpath, keep the tripod legs tucked in, and never step onto the roadway or tram tracks for an angle.
The method is simple.
- Compose the static parts first: the station, the kerb line, the direction the traffic will flow. Leave space where the trails will run.
- Set ISO 100 and f/8, then take a test exposure of 10 seconds. If the station's lit facade is blown out, close to f/11 or shorten the exposure.
- Watch the lights. Start the exposure just as a tram enters the frame, and let it run until the tram has left.
- Take a dozen frames. Traffic is unpredictable, and the best trail is often the one you did not plan.
A tram that stops mid-frame will leave a ghostly, semi-transparent body behind its light. Some photographers love that; others wait for a clear run. Either way, the longer the exposure, the more continuous the trails.
| Scene | ISO | Aperture | Shutter |
|---|---|---|---|
| Tram and car light trails | 100 | f/8 to f/11 | 10 to 30 s |
| Lit building at blue hour | 100 | f/8 | 2 to 8 s |
| Laneway light painting | 100 | f/8 | 15 to 30 s or Bulb |
| Hand-held street at night | 3200 to 6400 | f/1.8 to f/2.8 | 1/60 to 1/125 s |
How to focus at night
Autofocus needs contrast, and dark scenes do not offer much. The lens hunts, gives up, or locks onto the wrong thing.
The reliable fix is to autofocus once on something bright with a clear edge, such as the lit edge of the station's facade, a streetlight or an illuminated sign at the same distance as your subject. Then switch the lens or camera to manual focus so it does not refocus when you press the shutter. If your camera has focus magnification in live view, zoom in on a bright point and turn the focus ring until it is as small and crisp as it gets.
At f/8 and a wide focal length, depth of field is generous. Focus about a third of the way into the scene and most of it will be sharp.
White balance and noise after dark
City light is a mix. Older sodium lamps glow orange. Modern LEDs can be neutral or cool. Shop signs and tram interiors add their own colours. Auto white balance often splits the difference and leaves the scene a muddy orange.
Set white balance manually to about 3500 to 4000 K as a starting point. Lower numbers push the picture cooler and bluer; higher numbers warmer. If you shoot RAW, this is fully adjustable later, but getting close in camera helps you judge the picture on the screen.
Noise is rarely a problem at ISO 100, even at 30 seconds. Many cameras offer a long exposure noise reduction setting that takes a second dark frame after each shot. It can clean up hot pixels, but it roughly doubles the time each exposure takes. For light trails, where you want to catch the next tram, turn it off and deal with any stray pixels in editing.
Time becomes part of the picture.
Shoot at blue hour, not midnight
The best city night photographs are rarely taken in full darkness. In the twenty minutes or so after sunset, the sky holds a deep blue that balances the warm artificial light. The buildings still have shape against the sky, and the whole frame has colour. By full dark, the sky goes black and the picture becomes lights floating in nothing.
Check the sunset time, arrive half an hour before and be set up as the sky starts to deepen. The same idea drives our Docklands blue hour workshop, where the water adds reflections to the mix.
Light painting in a laneway
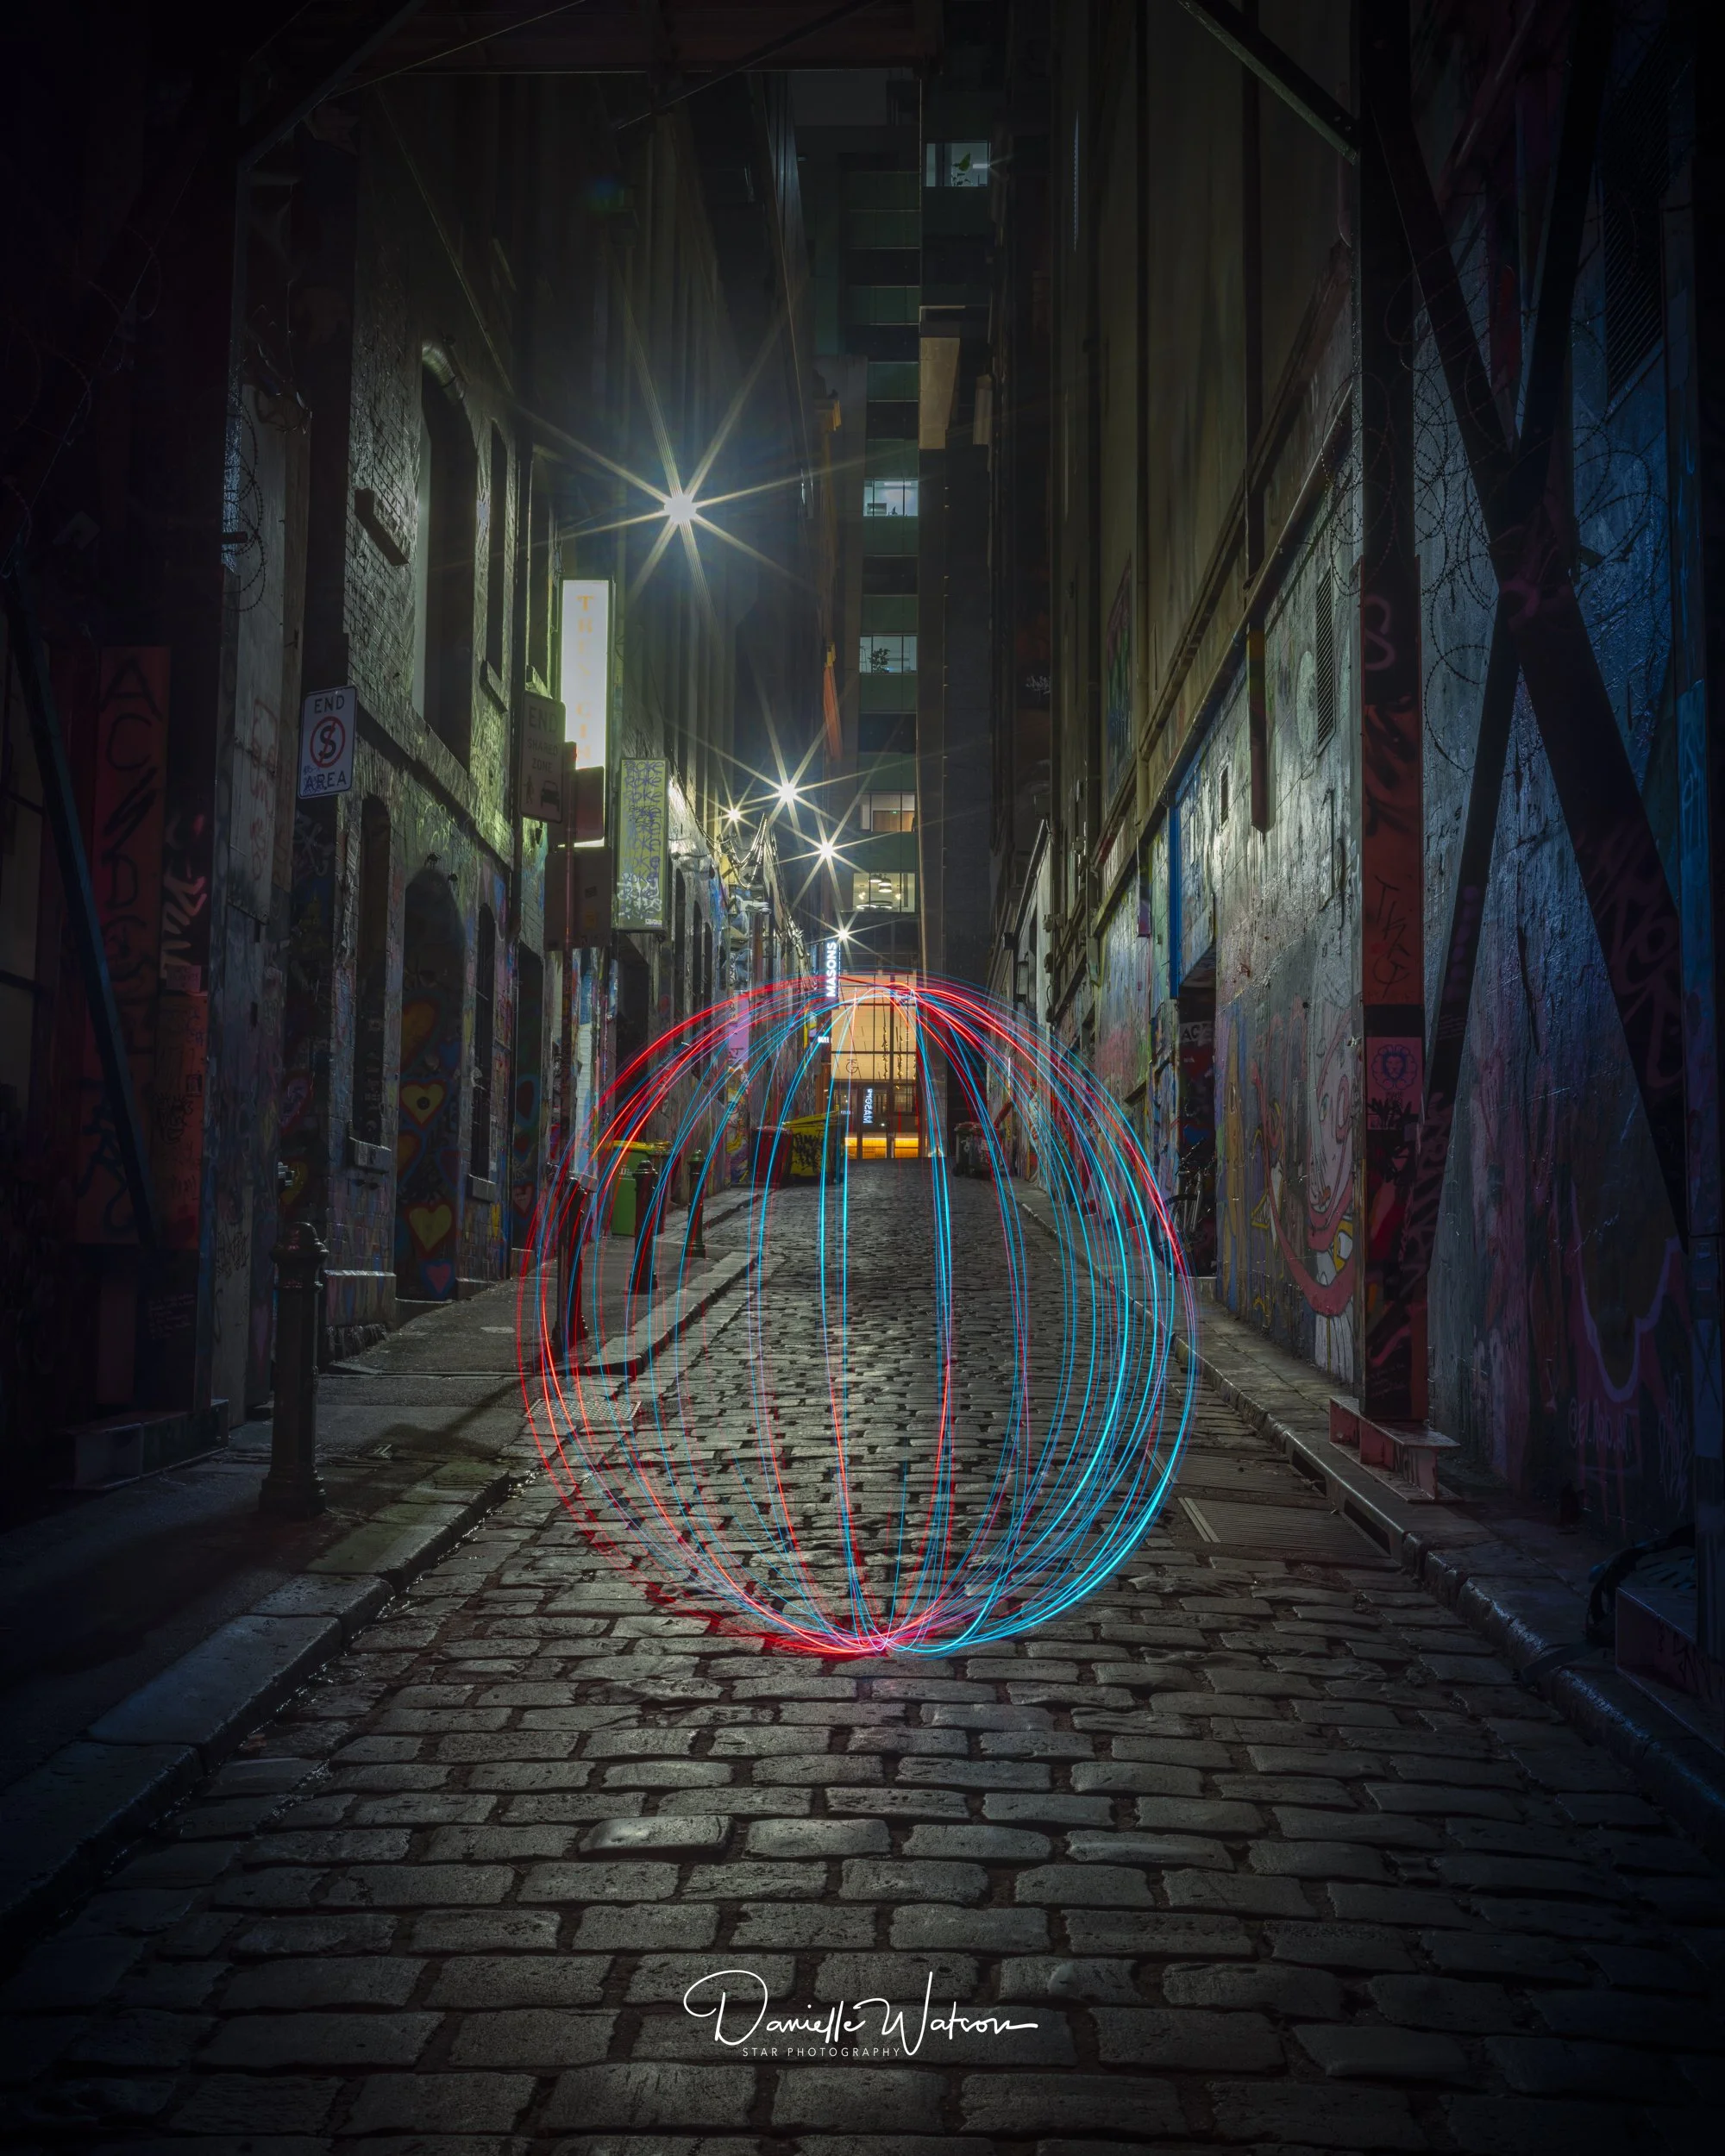
Light painting reverses the light trail. Instead of recording lights that move through a scene, you move the light yourself. The glowing orb in the laneway above is a classic: a small LED on a cord, spun in a circle while the person holding it turns slowly on the spot. Over a 20 to 30 second exposure the circles build a sphere. Dressed in dark clothing and never still in one place for long, the person holding the light barely registers.
Use the same settings as light trails: ISO 100, f/8, 20 to 30 seconds, or Bulb mode with a remote if you need longer. Focus on a spot where the light will be before you start. Laneways are shared spaces, so pick a quiet one, keep bright lights out of passers-by's eyes, and move on if you are in anyone's way. Our guide to the best photography spots in Melbourne includes lanes that suit this well.
Practise this
- Set up opposite Flinders Street Station at blue hour and shoot one tram at 5, 10, 20 and 30 seconds. Compare how the trail and the sky change.
- Practise night focusing at home: turn the lights off, leave one lamp on, autofocus on it, switch to manual, then photograph the room.
- With a friend and a torch, try a 20-second light painting. Write a single word in the air, remembering it will read correctly only if written facing away from the camera.
Questions, answered.
What are the best camera settings for night photography?
What shutter speed do you need for light trails?
Can you do night photography without a tripod?
Why are my night photos orange?
Published by CapturEDU, Melbourne photography education. Our educators are award-winning photographers with a Master of Arts in Photography (RMIT), AIPP and RPS membership.
